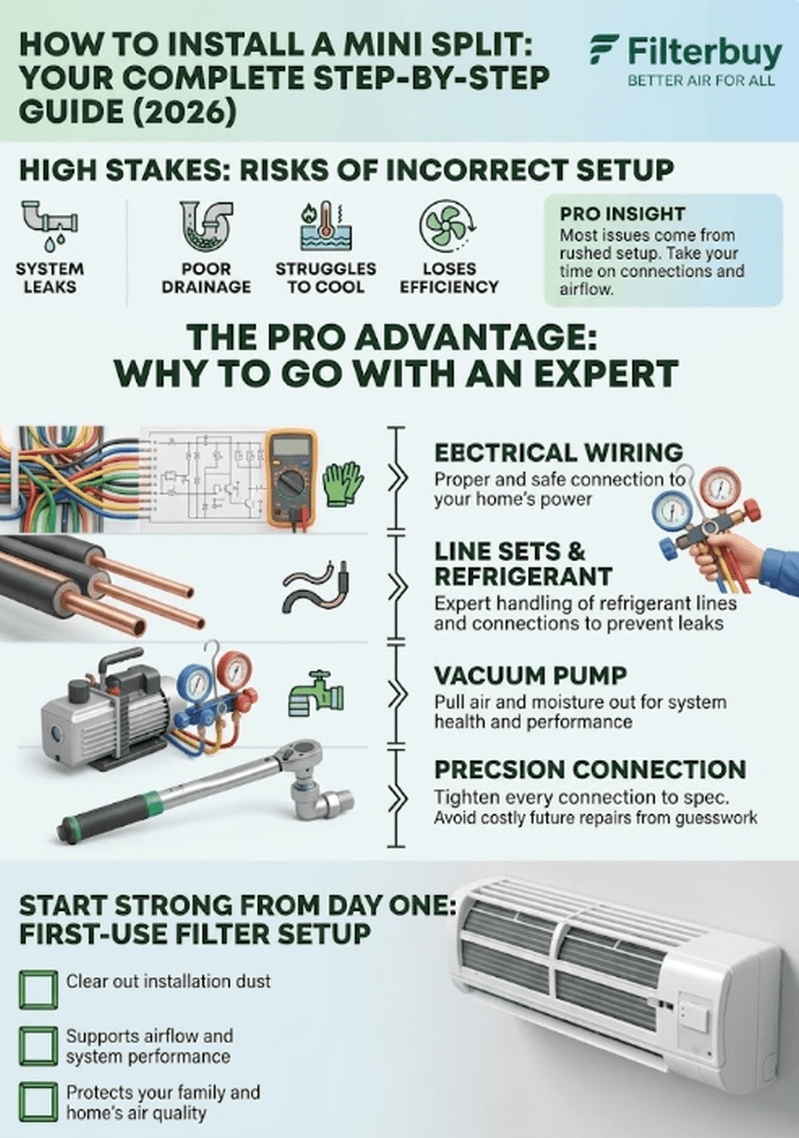
Sized right, sealed tight, and filtered from day one — the part many guides skip.
You can install a single-zone mini split yourself in about 4 to 8 hours, but getting the system size right comes before any tool. Mount the indoor unit, run and seal the line set, vacuum the lines, then release the refrigerant, power on, and set up a clean filter before first use.
The two steps that decide your results are sealing the line set and vacuuming the lines. The step that decides everything else is sizing: a system matched to your room's square footage runs the way it should.
Match your space to the right BTU before you begin:
Not sure which size fits your room? Take the quick match quiz below to find the right system before you start your install.

Answer a few quick questions and we'll match you to the right mini split system for your space.
Ready to browse? Explore Filterbuy mini split systems ›
A mini split can cool a room fast. Install it wrong, though, and that same system can leak, drain poorly, struggle to keep up, or lose efficiency before it ever hits its stride.
At Filterbuy, we care about what happens after the box gets opened. We’ve helped millions of homeowners think more carefully about airflow, filtration, and HVAC performance, and we’ve seen how often the small setup decisions shape the results you live with every day. This guide walks you through the full DIY process so you can install your mini split with more confidence and start strong from day one.
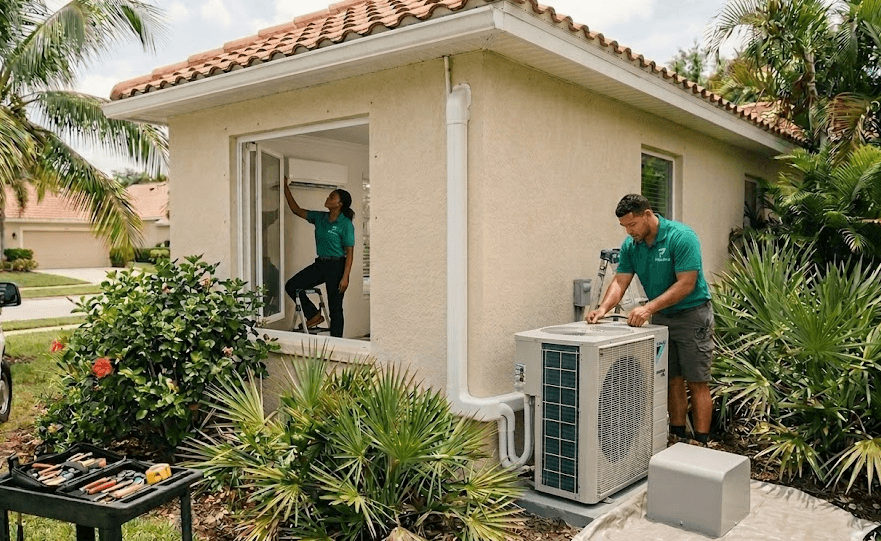
Mount the indoor unit on a wall bracket
Drill a hole for the line set and drainage
Install the outdoor condenser on a stable base
Connect refrigerant lines and tighten properly. For most traditional mini split systems, refrigerant work must be performed by a technician with EPA Section 608 certification.
Wire the system according to the diagram
Vacuum the lines to remove air and moisture (licensed technician step for traditional systems).
Release refrigerant and power on the system (licensed technician step for traditional systems).
Install a clean air filter before first use
What matters most:
Proper sizing before installation
Tight, sealed line connections
Clean airflow and filtration from day one
Pro insight:
From what we’ve seen, most issues don’t come from the unit—they come from rushed setup. Take your time on connections and airflow, and your system will perform the way it should.
You can install a mini split yourself, but the work demands care and precision
The line set, wiring, and vacuum step all matter more than most DIY guides admit
Filtration should be part of the install plan from the start
DIY can save money upfront, but mistakes can erase those savings
Proper sizing shapes comfort and performance
Yes, you can install a mini split yourself. But most homeowners should treat it as a serious home project, not a casual weekend task.
You need to feel comfortable with:
electrical wiring
drilling through an exterior wall
understanding that refrigerant handling on most traditional mini split systems requires EPA Section 608 certification
From what we’ve seen, DIY installs usually go well when the homeowner respects the details. Trouble starts when someone rushes the line set, guesses on wiring, or skips steps that look minor but affect long-term performance.
Pro insight: Many mini split problems start with installation, not with the equipment. Loose fittings, poor drainage slope, and blocked airflow create issues that look like product failure later.
Before you start, make sure the system size fits your space:
https://filterbuy.com/heating-cooling/mini-splits/sizing/mini-split-for-500-sq-ft/
Gather everything before you start. Stopping halfway through to chase a missing tool usually slows the work and raises the odds of a mistake.
Core tools:
drill
2- to 3-inch hole saw
level
mounting bracket
torque wrench
vacuum pump
manifold gauge set
wire stripper
voltage tester
adjustable wrench
Materials:
line set
electrical wiring
mounting hardware
drain hose
insulation
sealant
We’ve found that one of the most common DIY mistakes happens at the refrigerant connections. Homeowners often over-tighten or under-tighten those fittings. A torque wrench helps you avoid both.
Start with placement.
Install the indoor unit high on a wall where air can move freely across the room. Install the outdoor unit on a stable, level surface with enough clearance around it for airflow and service access.
Don’t tuck either unit into a tight spot just because it looks tidy. Your mini split needs room to move air and room for someone to work on it later.
Secure the mounting bracket to the wall. Check that it sits level before you lock it in place.
Then attach the indoor unit to the bracket. If the bracket tilts, the unit can drain poorly, and that can lead to water trouble inside the home.
Drill a hole through the wall for the line set, wiring, and drain hose. Most installs use an opening around 2 to 3 inches wide.
Angle the hole slightly downward toward the outside. That slope helps water drain the way it should instead of backing up.
Place the condenser on a pad or wall bracket. Keep it level. In some setups, you may also need to raise it above ground level.
That placement does more than keep the unit steady. It can also reduce vibration and help protect the system over time.
Run and connect the refrigerant lines between the indoor and outdoor units. Tighten every connection to the manufacturer’s spec, and insulate any exposed section that needs protection.
This step matters. A lot.
Loose fittings can leak. Over-tightened fittings can also leak. That’s why guessing here usually costs more later.
Connect the wiring between the indoor and outdoor units exactly as the manufacturer directs. Follow the wiring diagram. Confirm the grounding. Double-check every connection before you move on.
If this step gives you pause, listen to that instinct. Many homeowners decide to bring in a licensed professional for the electrical portion, and that’s a smart call when there’s any doubt.
Use a vacuum pump to pull air and moisture out of the lines before startup.
Skipping this step can hurt performance and shorten system life. Moisture and contamination don’t belong inside the system, even if everything else looks perfect from the outside.
Open the valves to release refrigerant into the system. Power the unit on, then test the cooling, airflow, and general operation.
Listen. Watch. Check for anything that seems off before you call the job finished.
A lot of DIY guides stop once the unit turns on. We don’t.
Install a clean, properly fitted air filter before regular use. Check that nothing blocks airflow. Clear out any dust or debris from the install area first.
That filter does real work from the beginning. It helps protect the system from buildup, supports better airflow, and helps keep the air in your home cleaner. At Filterbuy, we believe better air should start on day one, not after the first maintenance issue shows up. That focus on cleaner indoor air and practical protection sits at the center of the brand.
A few things usually drive the final cost:
labor
system size
number of zones
electrical upgrades
installation difficulty
DIY can lower the upfront cost. It can also get expensive fast when a bad install leads to service calls, refrigerant leaks, or poor performance you have to chase down later.
We see the same trouble spots again and again:
sealing the line set poorly
skipping the vacuum step
drilling the drain path at the wrong angle
forgetting that filtration affects performance too
Avoid those mistakes, and you give your system a much better start.
Installing the mini split is only part of the job. Keeping the air clean and the system protected matters just as much once the unit starts running.
Good filtration helps:
support system efficiency
reduce dust and allergens
limit buildup that can wear on the equipment
You may not see the dust and airborne particles moving through your home. That doesn’t mean they aren’t there. One of Filterbuy’s core ideas is to make those hidden issues easier to spot and easier to solve with clear, useful guidance.
Test every connection before you close everything up
Use a torque wrench instead of relying on feel
Keep airflow paths clear around both units
Check and replace filters on schedule after installation
Small choices make a big difference here. They affect comfort, efficiency, and how much trouble the system gives you later.
“After working with thousands of HVAC setups, we’ve learned that most mini split problems don’t start with the equipment; they start with small installation shortcuts that affect airflow, sealing, and filtration from day one. When you take the time to install it right, you’re not just cooling your home, you’re protecting your air, your system, and the people who depend on it.”
-Filterbuy Team
Installing a mini split isn’t just about following steps—it’s about understanding how your system, airflow, and indoor air quality all work together. These are the resources we trust and recommend if you want to get it right the first time.
https://www.energy.gov/energysaver/ductless-mini-split-heat-pumps
If you don’t understand how your system moves air and heat, it’s easy to make installation mistakes that hurt performance. This guide breaks it down in plain terms so you know exactly what your system needs to run efficiently.
https://www.energystar.gov/products/heating_cooling/ductless_heating_cooling
We’ve seen it firsthand—oversized and undersized systems both cause problems. This resource helps you compare efficiency ratings and choose a unit that actually matches your space and usage.
https://www.epa.gov/indoor-air-quality-iaq
Most people focus on cooling power and forget about the air they’re circulating. This guide shows how your HVAC setup impacts air quality—and why filtration should be part of your plan from day one.
https://www.mitsubishicomfort.com/resources
These manufacturer guides go beyond basic instructions. You’ll find wiring diagrams, spacing requirements, and mounting details that help you avoid the small mistakes that turn into big repairs later.
https://www.daikincomfort.com/resources/manuals
Professional installers don’t guess—they follow proven standards. These manuals give you a clear look at how systems are installed and configured for long-term performance.
https://filterbuy.com/heating-cooling/mini-splits/sizing/mini-split-for-500-sq-ft/
From our experience, sizing is where everything starts. When your system matches your space, airflow improves, efficiency stays consistent, and your home feels the way it should—comfortable and clean.
We’ve seen it firsthand—installation quality shows up in your comfort, energy bills, and air quality. These numbers explain why getting it right matters.
52% of home energy goes to heating and cooling
Source: https://www.eia.gov/energyexplained/use-of-energy/homes.php
What this means:
Efficient setup = lower monthly costs
Poor setup = long-term energy waste
Up to 30% efficiency loss from improper installation
Source: https://www.energystar.gov/campaign/heating_cooling
What we’ve seen:
Loose line connections reduce performance
Poor airflow setup strains the system
Skipping steps leads to avoidable repairs
Indoor air can be 2–5x more polluted than outside air
Source: https://www.epa.gov/indoor-air-quality-iaq/introduction-indoor-air-quality
Why this matters:
Your system circulates air immediately after install
Without proper filtration, pollutants spread
Clean air starts with correct setup
Bottom line:
Installation impacts performance
Setup affects energy costs
Filtration protects your air
When these three areas are handled right, your system works the way it should—from day one.
If you’re ready to move forward, do these four things next:
Confirm that your mini split is the right size for the space
Gather the tools and materials before installation day
Decide whether you want to handle the whole job yourself or bring in a pro for part of it
Set up proper filtration right away so the system starts clean
Most DIY guides make mini split installation look simple. In our experience, it’s the small details that decide how well your system performs.
It’s not just the unit—it’s how everything comes together:
Proper system sizing
Tight, accurate line set connections
Balanced airflow setup
Clean filter installed from day one
Miss one of these, and the system will still run—but not efficiently.
Installation isn’t just about turning the system on
It’s about setting it up to perform correctly long-term
Every step impacts comfort, energy use, and air quality
DIY installation can work—if you approach it the right way:
Treat it like a precision project, not a shortcut
Follow each step carefully, especially sealing and airflow
Don’t overlook filtration—it protects both your air and your system
When installation is done right:
Your home stays consistently comfortable
Your system runs more efficiently
Your indoor air stays cleaner
That’s the goal. And it starts with how you install it.
A: Yes—but success depends on preparation.
Understand wiring basics
Handle line set connections carefully
Follow each step without rushing
Insight:
Homeowners who treat this like a technical install—not a quick project—get better results.
A: Two steps require the most precision:
Line set connections
Vacuuming the system
Why it matters:
Small sealing issues can reduce performance
Poor vacuuming can affect system efficiency
A:
DIY install: 4–8 hours (single-zone)
First-time installs: May take longer
Tip:
Extra time spent checking connections helps prevent future problems.
A: Essential tools include:
Drill + hole saw
Torque wrench
Vacuum pump + gauge set
Wire stripper + tester
Insight:
Having the right tools upfront prevents shortcuts that impact performance.
A: Not always. Many homeowners use a hybrid approach:
DIY: Mounting and basic setup
Professional: Electrical or refrigerant work
Benefit:
Saves on labor costs
Ensures safe and efficient operation
Installing a mini split does more than change the temperature in one room. Done right, it can improve comfort, support efficiency, and help you build a healthier indoor environment.
At Filterbuy, we believe taking care of your HVAC system is one way you take care of your family. When you install your system carefully and support it with the right filtration, you protect your comfort, your equipment, and the air moving through your home. Better Air For All starts with choices like these.