July 16, 2026
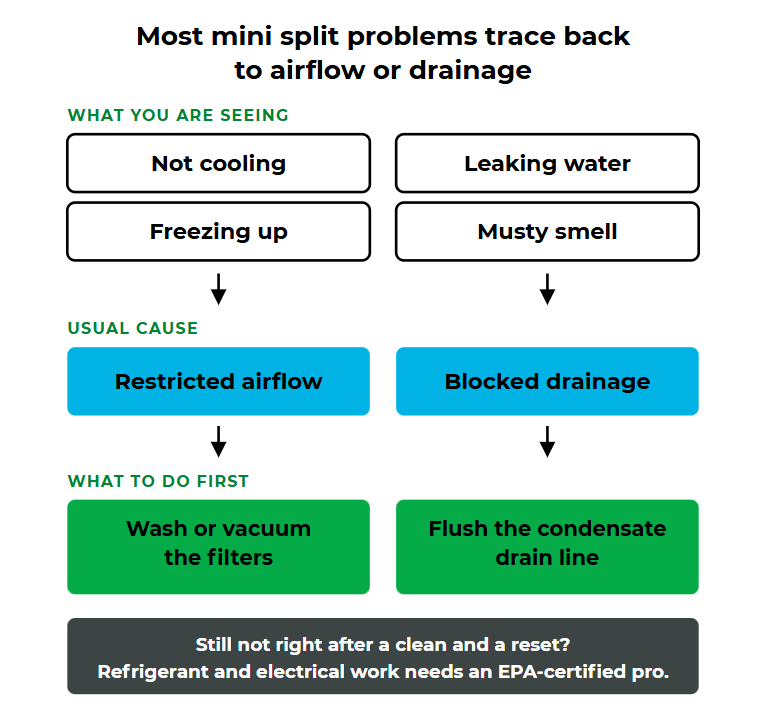
Most mini split problems trace back to two things: restricted airflow or blocked drainage. Start by washing the filters and flushing the condensate drain line. That clears the majority of no-cooling, leaking, musty-smell, and freezing complaints. If the system still struggles after a clean and a reset, the cause is usually refrigerant or electrical, and that work needs an EPA-certified pro.
Not cooling — dirty filters, wrong mode, or a blocked outdoor unit. Clean the filters, set the remote to Cool, clear the debris.
Leaking water — a clogged condensate drain line. Flush it out and check that the unit sits level.
Musty smell — mold or mildew on the indoor coil. Wash the filters, dry them fully, run Dry Mode.
Freezing up — restricted airflow. Turn it off, let the ice thaw, then clean the filters.
Not turning on — dead remote batteries or a tripped breaker. Swap the batteries, reset the breaker.
If the room never keeps up even when everything is clean, the unit may be the wrong size for the space — the quick match quiz below points you to the right BTU.
Answer 3 quick questions and we will match you to the right mini split for your space.
Rather browse first? See Filterbuy mini split systems in 12,000, 18,000, and 24,000 BTU.
It's frustrating when your mini split AC suddenly stops working, especially when you rely on it to keep your home comfortable. Whether it's not cooling, leaking water, or making a strange smell, the good news is that many common problems have simple DIY solutions.
Instead of immediately calling a technician, a few basic checks can often solve the issue. Many problems are caused by simple things like dirty air filters or incorrect settings.
This guide will walk you through the most common mini split AC problems, helping you diagnose the issue, find a quick fix, and know when it’s time to call in a pro.
Check the Basics First: Many mini split AC issues can be resolved by simple maintenance tasks such as cleaning air filters or adjusting system settings.
Diagnose System Issues: Understanding common problems helps you identify the root cause rather than guessing the issue.
DIY Fixes Can Save Time and Money: For many minor problems, you can perform easy fixes without needing a technician.
Know When to Call a Professional: If the problem persists or involves complex repairs, it is best to contact a certified technician to avoid further damage.
Regular Maintenance is Crucial: Preventative care, like routine cleaning and system inspections, can minimize the likelihood of technical issues.
Before grabbing your tools, run through this quick checklist. These fast fixes solve a surprising number of common problems.
Check your thermostat mode. Ensure it is set to "Cool" rather than "Auto" or "Fan."
Clean your air filters. Dirty filters restrict airflow and cause major performance drops.
Inspect airflow on both units. Make sure furniture, curtains, or outdoor debris are not blocking the indoor air handler or the outdoor condenser.
Clear the condensate drain line. A blocked line leads to leaks and musty smells.
Look for ice buildup. Check the indoor coils and the outdoor unit for any frost.
Reset the system. Try turning off the unit and flipping the circuit breaker off for five minutes before turning it back on.
A mini split AC not cooling is the most common complaint from homeowners. Fortunately, the fix is usually quick and inexpensive.
The primary culprits for a lack of cold air include dirty air filters, incorrect thermostat settings, and blocked airflow around the outdoor compressor. In more severe cases, you might be dealing with low refrigerant levels.
Start by cleaning your filters. In humid regions across the USA, you should wash or vacuum your filters every two to four weeks during peak summer usage. Next, set your remote to "Cool" and lower the temperature five to ten degrees below the current room temperature. Finally, walk outside and clear away any leaves, tall grass, or snow obstructing the outdoor unit.
If your unit is still not cooling after a thorough cleaning and a reset, you likely have a refrigerant issue. Handling refrigerant requires an EPA-certified professional, so you will need to schedule a service call.
Seeing water drip from your indoor air handler is alarming, but it is usually a drainage issue rather than a catastrophic failure.
A mini split AC leaking water usually happens because the condensate drain line is clogged with dirt, dust, or algae. Other causes include severely dirty filters, a unit that was installed off-level, or frozen coils that are rapidly thawing.
First, locate your condensate drain line and flush it out. You can use a wet/dry vacuum to suction out the clog from the outside. Next, clean your air filters to ensure proper airflow over the coils. If the unit looks crooked on the wall, check its tilt. It needs to be perfectly level or slightly tilted toward the drain hole.
If you flush the drain line and the leaking persists, or if you suspect water is damaging your drywall and electrical components, contact a technician immediately.
If you turn on your system and get hit with a foul odor, you are probably wondering: why does my mini split AC smell?
A musty smell in a mini split AC is almost always caused by mold and mildew growing on the indoor evaporator coil. This happens when dust from dirty filters mixes with the natural moisture inside the unit, creating stagnant water in the drain pan.
Remove and wash your air filters with mild soap and warm water. Let them dry completely before reinstalling them. You can also run the unit on "Dry Mode" for a few hours to pull excess moisture out of the system. For a deeper clean, purchase a foaming coil cleaner designed specifically for ductless systems.
To stop odors before they start, maintain a regular cleaning schedule. Ensure your drain line flows freely so water never sits in the pan. Avoid leaving the unit off for long periods in highly humid environments.
Ice on your air conditioner during a hot summer day is a clear sign that something is restricting the system's ability to breathe.
A mini split AC freezing up is generally tied to severe airflow restrictions caused by heavily soiled filters. It can also happen if the system is low on refrigerant, which causes the coils to drop below freezing and turn normal condensation into ice.
Turn the system completely off. Do not try to run it while it is frozen, as this can destroy the compressor. Let the ice thaw completely. While it thaws, remove and clean your air filters. Once the ice is gone and the clean filters are back in place, turn the unit on and restore normal airflow.
If the system freezes up again shortly after you clean the filters and restart it, you likely have a refrigerant leak. Call an HVAC professional to locate and repair the leak.
A completely unresponsive system feels like a worst-case scenario, but the solution might just take a few seconds.
The most common reasons a mini split won’t turn on include a tripped circuit breaker, a generalized power issue to the outdoor unit, or dead batteries in your remote control.
First, replace the batteries in your remote. If the remote screen is on but the unit will not beep, check your home's electrical panel and reset the breaker dedicated to the AC. Many modern mini splits feature an auto-restart function, so giving it a fresh power cycle often clears temporary sensor errors.
Ductless systems are famous for their quiet operation. When they start getting loud, pay attention.
Light humming or the occasional clicking sound of plastic expanding is completely normal. However, rattling, grinding, or buzzing noises usually point to loose internal parts, debris caught in the outdoor fan, or failing electrical components.
Inspect the outdoor unit for sticks, leaves, or rocks that might be hitting the fan blades. Turn the unit off and carefully clear the debris. Check the indoor unit's front panel to ensure it is snapped tightly into place.
| Issue | Most Common Cause | DIY Fix | When to Call a Pro |
|---|---|---|---|
| Not cooling | Dirty filters | Clean filters | Refrigerant issue |
| Leaking water | Clogged drain | Flush drain | Persistent leaks |
| Musty smell | Mold growth | Clean unit | Deep cleaning needed |
| Freezing | Airflow issue | Defrost + clean | Repeated freezing |
The best troubleshooting strategy is prevention. By following a few basic maintenance steps, you can avoid 90% of the issues listed in this guide. Clean your indoor air filters every 30 to 90 days. Flush your condensate drain line seasonally to prevent clogs and water damage. Keep the outdoor unit clear of vegetation, allowing at least two feet of clearance on all sides. Finally, schedule an annual inspection with a certified technician to check your refrigerant levels and electrical connections.
If you find that your system is constantly running but never keeping the room cool, it might be improperly sized for the space. Choosing the right BTU rating is critical for energy efficiency and longevity.
12,000 BTU (Up to 250–300 sq ft): Available in 115V or 230V. Best for 1-car garages or small bedrooms.
18,000 BTU (Up to 350–400 sq ft): Available in 230V. Best for large 1-car or small 2-car garages.
24,000 BTU (Up to 500–550 sq ft): Available in 230V. Best for 2-car garages or larger open-concept spaces.
Sizing your unit correctly ensures you get the most out of your investment. Plus, when you shop with Filterbuy, you can take advantage of fast free shipping, superior energy efficiency, and easy maintenance.
While cleaning filters and flushing drain lines are great DIY projects, some problems require you to step back and use your warranty. Modern mini splits come packed with advanced features like self-diagnosis systems, auto-restart capabilities, and built-in leak detection.
If your system's display panel is flashing a specific sensor error code, or if you suspect electrical failures or refrigerant issues, do not attempt to fix it yourself. Tampering with the internal electronics or refrigerant lines can void your coverage. Instead, check your warranty coverage. Many high-quality units come with a standard 5-year warranty that protects you from major manufacturing defects.
Owning a mini split means enjoying efficient, quiet comfort all year long. When things go wrong, remember that most issues require nothing more than a quick filter wash or a drain line flush. By staying proactive with your maintenance routine, you will keep your home comfortable and your energy bills low.
If you have tried the basic fixes and your system is still struggling, check your warranty coverage and reach out to a professional. Ready to upgrade or expand your home comfort? Shop energy-efficient systems from Filterbuy today and find the perfect size unit for your space.
Mini splits usually stop cooling due to dirty filters, incorrect settings, or restricted airflow. Start by cleaning the filters and setting the unit to Cool. If the air still isn’t cold, it may be a refrigerant issue.
This is typically caused by a clogged condensate drain line. Flushing the line and cleaning filters often resolves the issue. Persistent leaks may require professional inspection.
Musty odors usually come from mold or mildew buildup inside the unit. Cleaning filters and running dry mode can help, but deeper cleaning may be needed.
Freezing is often caused by poor airflow or dirty filters. Turn the unit off, let it thaw, and clean the filters before restarting.
Filters should be cleaned every 30 to 90 days, or every two to four weeks in high-use or humid environments.
Basic maintenance like cleaning filters and clearing drain lines is DIY-friendly. Refrigerant or electrical issues should be handled by a licensed professional to ensure compliance with EPA guidelines.
Check for a tripped breaker, power issues, or dead remote batteries. Resetting the system often resolves this.
Yes, light clicking or humming is normal. Loud or unusual noises may indicate debris or loose components.
Routine maintenance like cleaning filters, clearing drains, and keeping airflow unobstructed prevents most issues.
Warranties typically cover manufacturer defects and system failures, but not maintenance-related issues like dirty filters.