April 17, 2026
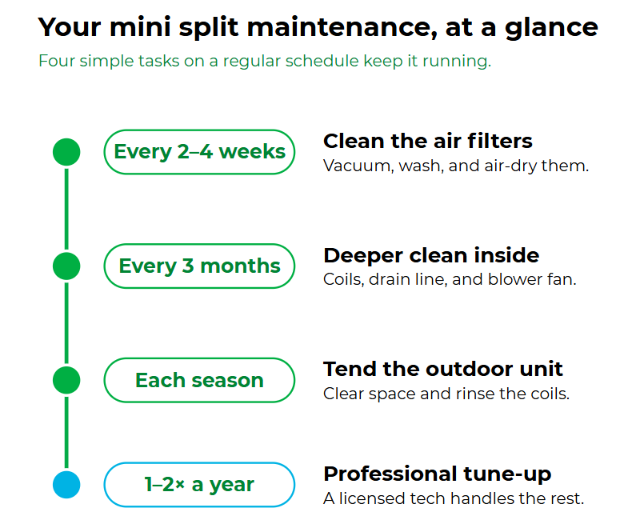
The most important step is cleaning the reusable air filters every 2 to 4 weeks. Add a deeper clean every few months and a professional tune-up once or twice a year.
Most tasks take just a few minutes with common household items, and they keep your system efficient and longer-lasting. Shopping for a low-maintenance unit? Compare our mini split systems.
Answer 3 quick questions and we'll match you to the right mini split for your system.
You rely on your ductless system to keep your home comfortable year-round. But like any HVAC setup, it requires regular upkeep to run efficiently. Ignoring basic care can lead to higher electricity bills, poor indoor air quality, and unexpected breakdowns right when you need cooling the most.
Proper mini split AC maintenance does not have to be complicated or expensive. You can handle most of the essential cleaning tasks yourself using just a few common household items. Setting aside a few minutes each month will keep your air fresh and your system running smoothly.
This comprehensive guide covers everything you need to know about caring for your equipment. We will walk you through a clear mini split maintenance schedule, explain exactly how to clean a mini split AC step by step, and highlight when it makes sense to call a licensed HVAC professional.
Regular maintenance of your mini split AC system is essential to ensure optimal performance and longevity.
Performing basic cleaning tasks monthly, such as cleaning filters and keeping the unit free of dust and debris, can significantly improve efficiency.
Use common household items like a soft cloth, a vacuum, and mild soap to handle most cleaning tasks easily.
Follow a clear schedule to stay consistent with maintenance and avoid costly repairs.
Always know when to seek professional assistance for deeper cleaning or technical issues beyond routine care.
Taking care of your ductless system provides immediate and long-term benefits for your home and your wallet. According to the U.S. Department of Energy, proper HVAC maintenance guarantees optimal performance. Here is why staying on top of your maintenance schedule is so important:
Energy savings: A clean system uses significantly less power, helping you save anywhere from 5% to 30% on your monthly cooling and heating bills.
Prevent efficiency loss: Neglected units can lose up to 30% of their operating efficiency over time due to dust and debris buildup.
Extend lifespan: Routine care helps your system last 10 to 15 years or more, delaying the need for a costly replacement.
Improve indoor air quality: Cleaning filters and coils stops mold, dust, and pet dander from circulating throughout your living space.
Following a consistent routine is the easiest way to prevent unexpected issues. Use this quick overview table to track your tasks:
| Task | Frequency |
|---|---|
| Filter cleaning | Every 2 to 4 weeks |
| Indoor unit cleaning | Every 3 to 6 months |
| Drain line check | Quarterly |
| Outdoor unit cleaning | Seasonal |
| Professional service | 1 to 2 times per year |
Tackling a few simple chores every month keeps your indoor air healthy and your system operating efficiently. These are the most critical tasks for any homeowner.
Regular mini split ac filter cleaning is the absolute most important DIY task you can perform. A clean filter improves system efficiency by 5% to 15%.
Step 1: Turn off the power to your unit using the remote control or breaker.
Step 2: Carefully open and remove the front panel of the indoor air handler.
Step 3: Slide out the reusable mesh filters.
Step 4: Vacuum the filters gently to remove loose dust, then wash them with warm water and a mild soap.
Step 5: Allow the filters to air dry completely before reinstalling them. Never put damp filters back into the unit.
Dust naturally gathers on the exterior of your wall-mounted unit. Use a dry microfiber cloth to wipe down the plastic casing. Pay special attention to the directional vents and louvers, as dust buildup here can eventually blow back into your room.
Look around the indoor unit to ensure nothing is blocking the airflow. Make sure curtains, tall furniture, or accumulated dust are not restricting the air path. Blocked vents force the system to work harder, wasting electricity.
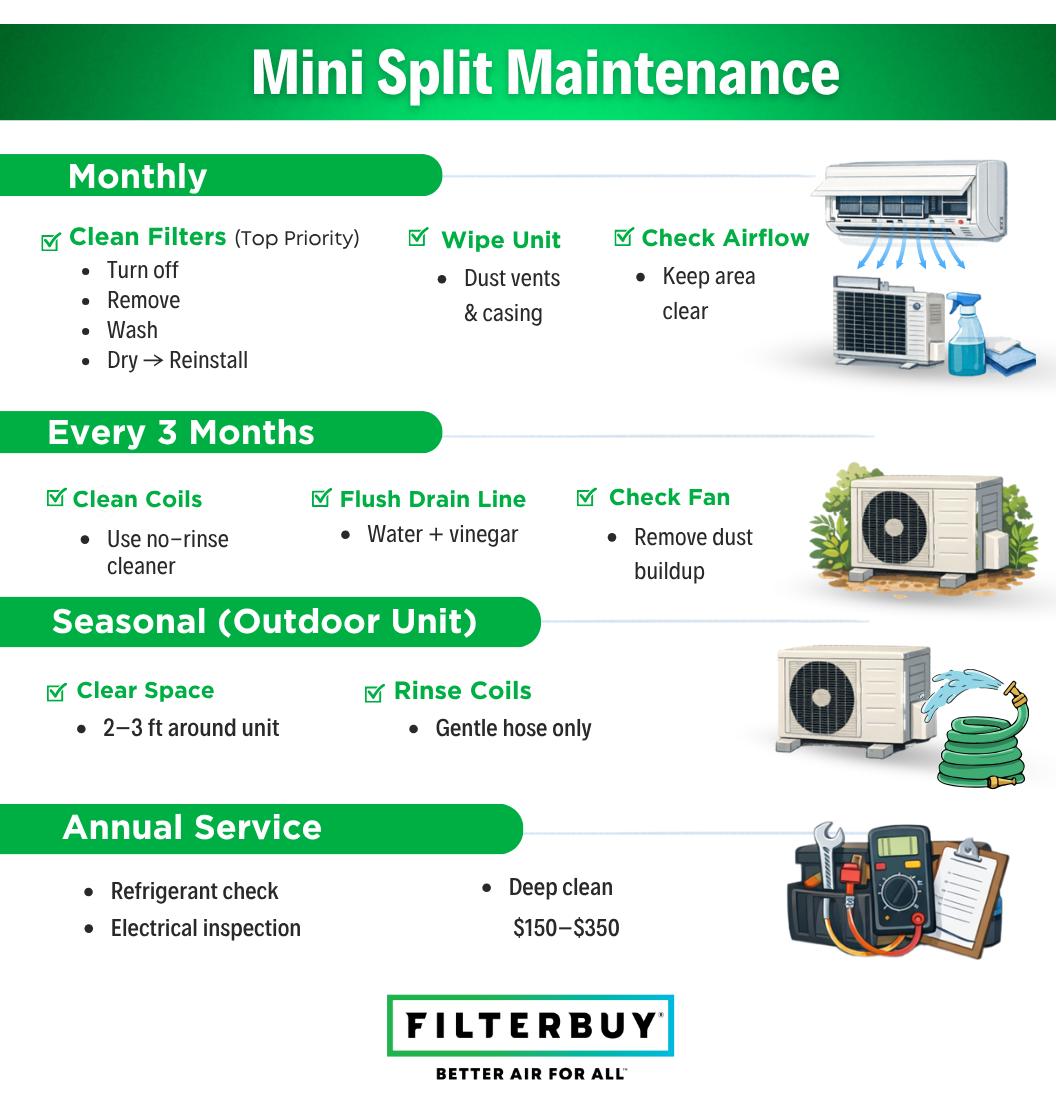
Every quarter, your system needs a slightly deeper clean to prevent internal component issues.
The evaporator coils inside your air handler absorb heat from your home. When covered in dirt, they cannot do their job properly. Purchase a no-rinse, foaming coil cleaner designed specifically for ductless systems. Spray the cleaner onto the coils and let it sit. The foam will break down the dirt and naturally drip away. You can optionally use a very low-pressure water spray to rinse the coils, but a no-rinse solution is usually sufficient for DIYers.
The condensate drain line removes moisture from the indoor unit. If it gets clogged with algae or debris, water can back up and leak down your walls. Pour a small mixture of water and white vinegar down the drain pan to clear out any emerging clogs and prevent mold growth.
Located behind the louvers, the cylindrical blower fan pushes conditioned air into your room. Shine a flashlight inside to check for heavy dust buildup. A dirty blower wheel reduces airflow and causes the unit to run louder than normal. If it is heavily soiled, you may need a special brush to clean the blades gently.
Your outdoor condenser sits exposed to the elements all year. Give it some attention before the heavy cooling and heating seasons begin.
Your outdoor unit needs to breathe. Maintain at least 2 to 3 feet of clear space around the entire condenser. Cut back overgrown bushes, remove tall weeds, and clear away fallen leaves or branches.
Dirty outdoor condenser coils can reduce your system's efficiency by up to 30%. Turn off the power at the outdoor disconnect box. Use a garden hose with a gentle spray nozzle to wash dirt and grime off the metal fins. Never use a high-pressure washer, as the intense force will bend the delicate aluminum fins and ruin the unit.
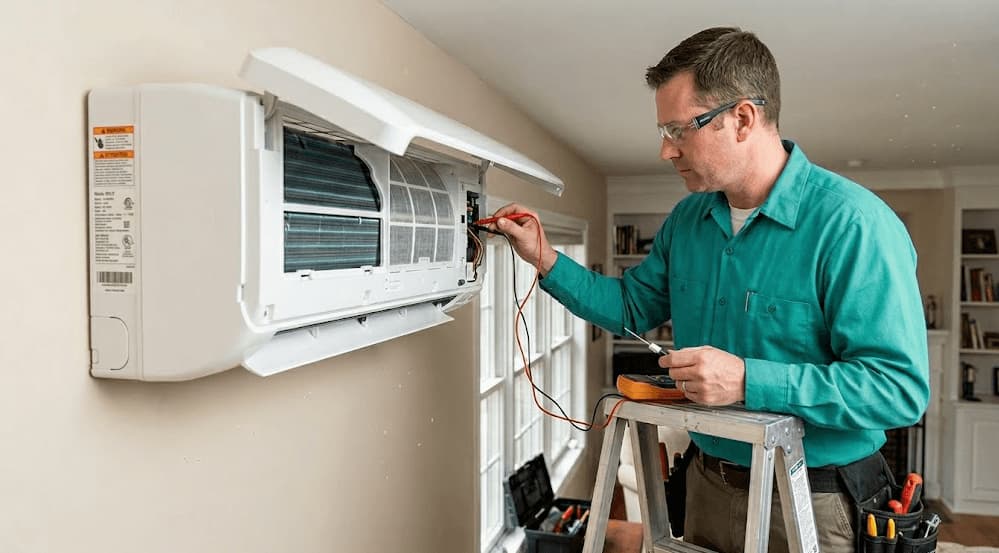
While DIY cleaning is essential, certain tasks require a licensed HVAC technician. Scheduling a professional tune-up once or twice a year keeps your warranty intact and catches hidden problems.
A professional will perform a refrigerant level check, an electrical system inspection, and a deep cleaning of the internal coils and blower wheel. Annual professional maintenance generally costs between $150 and $350. This small investment pays for itself by preventing major repairs and extending the lifespan of your unit by several years.
Many modern systems feature a mini split self cleaning function. When activated, the unit uses high heat (typically around 55°C or 131°F) to rapidly dry out the internal evaporator coils and components. This process prevents moisture buildup, which drastically reduces the chances of mold and bad odors forming inside the unit.
However, you must understand a critical point: the self-cleaning mode does not replace manual filter washing. It simply keeps the internal parts dry. You still need to follow your regular cleaning schedule for the filters and external parts.
Skipping your maintenance routine leads to frustrating and costly issues. Watch out for these common warning signs:
Higher energy bills: A dirty system works harder, driving electricity costs up by 20% to 30%.
Weak airflow: Clogged filters and dirty blower wheels restrict the amount of air pushing into your room.
Water leaks: A blocked condensate drain line forces water out of the indoor unit and onto your floor.
Bad odors: Moisture trapped inside a dusty unit creates a breeding ground for mildew, causing a musty smell.
System failure: Overworked compressors eventually overheat and fail, leading to expensive emergency repairs.
Clean filters more often if you have pets: Dog and cat hair clogs mesh filters rapidly. Check them every two weeks.
Set maintenance reminders: Use your phone calendar to alert you when it is time to clean the filters.
Keep the outdoor unit shaded: Providing shade for your outdoor condenser keeps it cooler, helping it operate more efficiently. Just ensure the shade structure does not restrict airflow.
Never skip seasonal checks: A quick visual inspection before summer and winter saves you from surprise breakdowns.
No HVAC system lasts forever. You should consider replacing your unit entirely if it is over 10 to 12 years old and requires frequent repairs. Furthermore, if your system struggles to cool your home or your energy bills remain high despite thorough cleaning and professional maintenance, upgrading to a newer, more efficient model is usually the smartest financial choice.
If you are upgrading an old system or adding cooling to a new space, selecting the right hardware makes maintenance incredibly easy. Homeowners across Northern America choose Filterbuy mini splits for their reliability and user-friendly features.
Filterbuy units feature 55°C self-cleaning technology to keep internal components dry and mold-free. Built-in filter cleaning reminders take the guesswork out of your maintenance schedule. With multi-layer filtration, a robust 5-year warranty, and fast, free shipping, Filterbuy provides a complete, low-maintenance solution for your home comfort needs.
Consistent maintenance guarantees incredible energy savings and adds years to the life of your equipment. By adopting simple monthly habits like washing your air filters, you actively prevent the majority of costly repairs.
Take a few minutes this weekend to check your filters and inspect your outdoor unit. A little effort today ensures your home stays cool and comfortable all season long. Explore Filterbuy Mini Split Systems to upgrade to a low-maintenance, energy-efficient solution today.
Frequently Asked Questions
You should clean the indoor air filters every two to four weeks. The indoor unit exterior needs a wipe-down every few months, while the outdoor unit should be cleared of debris seasonally.
Turn off the power, remove the front panel of the indoor unit, and slide the filters out. Vacuum the loose dust, wash the filters with mild soap and warm water, and let them air dry completely before reinstalling them.
Yes, you can easily handle basic tasks like washing filters, wiping down the indoor air handler, and clearing leaves away from the outdoor condenser. However, deep electrical inspections and refrigerant checks require a licensed professional.
Neglected systems suffer from weak airflow, foul odors, and water leaks. Your energy bills will increase noticeably, and the compressor will wear out faster, leading to a premature and expensive system failure.
No. The self-cleaning function only dries out the internal coils to prevent mold growth. You still have to manually remove, wash, and reinstall the mesh air filters every month.
Water leaks almost always happen because the condensate drain line is clogged with dirt or algae. Flushing the drain line with a mixture of water and vinegar usually resolves the backup.
A routine tune-up from a licensed HVAC technician typically costs between $150 and $350. This annual service helps prevent major breakdowns and keeps your manufacturer's warranty valid.