
What Homeowners Need to Know Before They Start
Yes — a capable homeowner can install a single-zone mini split in a weekend and save $2,000 to $5,000 versus hiring a pro. Pre-charged systems like MRCOOL DIY use quick-connect line sets, so you skip the refrigerant handling that normally requires EPA Section 608 certification.
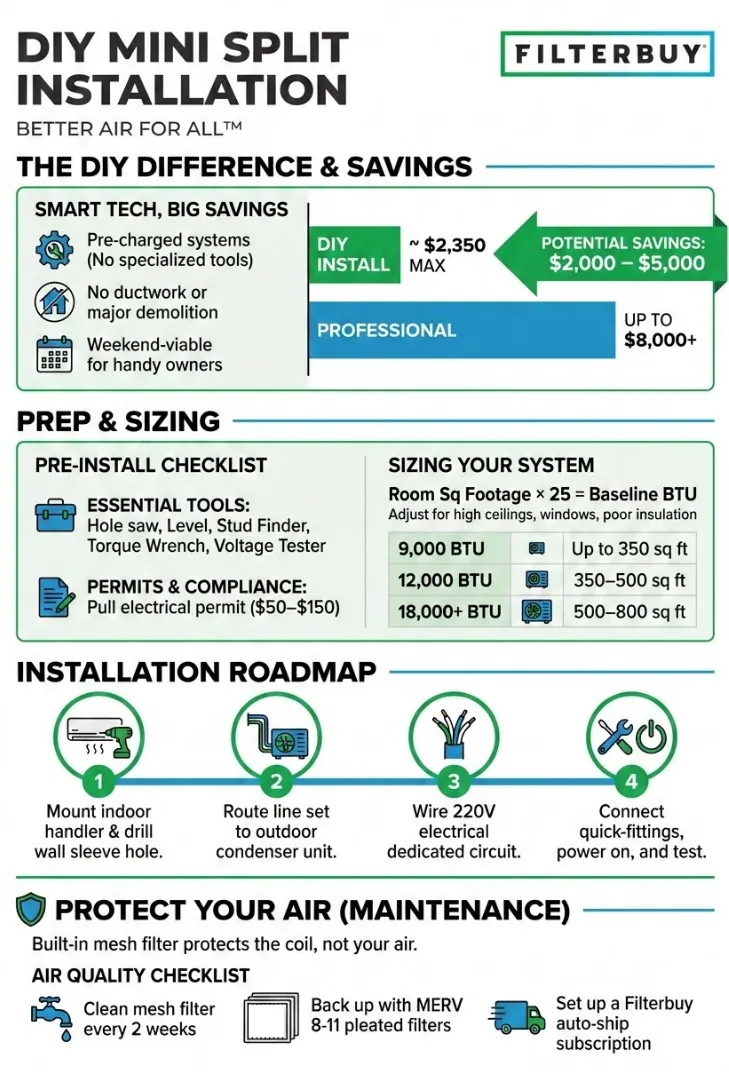
You’ll still need to size the unit (square footage × 25 = baseline BTU), pull a $50 to $150 permit, and wire a dedicated 220V circuit — or bring in an electrician for that step.

Answer 3 quick questions and we’ll match you to the right mini split for your space.
Ready to browse? Explore Filterbuy mini split systems ›
At Filterbuy, we've spent over a decade manufacturing HVAC filters and working alongside more than two million households. We've watched DIY mini split installation grow from a workaround into one of the most practical home improvement projects a capable homeowner can take on in 2026. We've also watched it go wrong — not because the homeowner lacked skill, but because they didn't know what the project actually demanded before the boxes arrived. The right tools, a clear read on the permit process, the 220V electrical reality, and the one post-install step that separates a well-installed system from one that also protects your family's air — those are the details that determine the outcome.
This guide covers all of it. By the end, you'll know exactly what DIY mini split installation requires, whether it fits your skill set and situation, and what to do the moment the system starts running to protect your home's air for the long haul.
A DIY mini split installation is a weekend-viable project for capable homeowners — but preparation determines the outcome. Size your system using the square footage formula (sq ft x 25 = baseline BTU), pull your permit before ordering equipment, and choose a pre-charged system that uses quick-connect line sets to eliminate the refrigerant handling step that requires EPA Section 608 certification. Budget $1,000 to $2,350 for a single-zone DIY install versus $3,000 to $8,000 or more for a professional install of the same system. Once the system is running, clean the built-in mesh filter every two weeks — and back it up with a MERV 8 to MERV 11 whole-home filter in your central system, because the mesh filter protects the coil, not your family's air.
A DIY mini split is a two-piece ductless system — indoor air handler and outdoor condenser, connected through a three-inch hole in an exterior wall. No ductwork, no major demolition.
Pre-charged systems ship with refrigerant sealed inside a quick-connect line set. That's what makes self-install possible without a refrigerant certification for most configurations — but always confirm current EPA guidance before completing the refrigerant connection step.
The BTU sizing formula is straightforward: square footage multiplied by 25 gives your baseline. Adjust upward for poor insulation, high ceilings, large windows, and harsh climates. Don't rely on online calculators alone — cross-reference the manufacturer's sizing chart.
Pull your permit before you start. Most jurisdictions require one for the electrical work connected to a new HVAC system. Cost runs $50 to $150 in most areas. Skipping it creates real problems later.
A capable DIYer saves $2,000 to $5,000 on a single-zone installation versus a full professional install — without sacrificing system quality or performance.
Your mini split's built-in mesh filter doesn't remove fine particles, pollen, or pet dander. A MERV 8 to MERV 11 whole-home filter strategy is what completes the air quality picture.
Clean the mini split's mesh filter every two weeks during peak season. Set up a filter subscription for your central system so you never miss a cycle.
A mini split is a ductless heating and cooling system: one indoor air handler mounted high on a wall, one outdoor condenser unit, connected by a narrow conduit running through a small hole in your exterior wall. No ductwork required.
What makes a system genuinely DIY-ready is pre-charged refrigerant technology. Traditional mini split installation requires a licensed technician to handle and charge the refrigerant — a process that demands specialized equipment and EPA Section 608 certification. A pre-charged mini split ships with refrigerant already sealed inside a quick-connect line set. You attach it the same way you'd connect a garden hose fitting, without certification, special tools, or refrigerant handling.
That quick-connect design changed this category. It's why a moderately handy homeowner can now install a no line set mini split in a single weekend that would have run $3,000 to $5,000 in professional labor just a few years ago.
That said, this project isn't for everyone. The right candidate is:
Comfortable using power tools, including a drill and a hole saw
Able to work safely with 220V electrical connections — or willing to bring in an electrician for that step
Comfortable reading a wiring diagram and following a manufacturer's installation manual cover to cover
Installing a single-zone system in a room, addition, garage, or outbuilding
If multi-zone systems, complex electrical panels, or permit-heavy jurisdictions are part of your situation, our Filterbuy HVAC Solutions team handles the professional installation route.
The most common reason a DIY mini split project stalls isn't the installation itself. It's the prep work that got skipped. Confirm every item below before you order equipment.
Tools You'll Need
Drill with a 2.5-to-3-inch hole saw bit for the wall sleeve
Stud finder and level for accurate bracket placement
Adjustable wrench and torque wrench for line set connections
Voltage tester and multimeter for electrical safety verification
Wire stripper and basic electrical tools (or a hired electrician for the panel work)
Safety glasses and work gloves
Most jurisdictions require a building permit for any electrical work connected to a new HVAC system. Typical permit costs run $50 to $150. Pull it before you start work — not after. Skipping it can create real complications at insurance claim time and during home resale inspections down the road.
Call your local building department before ordering equipment. Requirements vary by city and county. Some jurisdictions require a licensed electrician to perform or sign off on the electrical connection even when the homeowner handles the physical installation.
Here's the technical clarification that stops most first-time buyers in their tracks: the EPA requires Section 608 certification to handle, add, or remove refrigerant from a mini split system. This applies to connecting and disconnecting pre-charged line sets in most technical interpretations. Other line set was engineered with a quick-connect system specifically designed to address that barrier, but always confirm current EPA guidance at epa.gov before completing the refrigerant connection step.
For many homeowners, the safest path is to handle the physical installation and hire a certified HVAC technician for the refrigerant connections only. That hybrid approach still saves thousands compared to a full professional install.
For pre-charged systems, yes — with one important caveat. Other systems use quick-connect line sets that remove the refrigerant handling step that traditionally requires EPA Section 608 certification. The electrical connection to a dedicated 220V circuit, however, typically requires a licensed electrician or a building permit in most jurisdictions. Check local requirements before you order equipment.
The MRCOOL DIY series is built specifically for homeowner installation. Its pre-charged line sets, included installation hardware, detailed step-by-step guide, and video tutorial library set it apart from systems that merely tolerate DIY installs. Other brands with pre-charged options include Senville and Klimaire — but MRCOOL's DIY-first engineering and support resources are what make it the most recommended starting point for first-time self-installers.
A 500 square foot room typically needs 12,000 BTU, which is a 1-ton unit. Start with the formula: square footage multiplied by 25. Then adjust upward for poor insulation, vaulted ceilings, or large sun-facing windows. Oversizing is actually the more common mistake — a unit that's too large short-cycles and never properly removes humidity from the space.
Standard mini split systems require a Section 608-certified technician for all refrigerant work. DIY-specific systems like MRCOOL use pre-charged quick-connect line sets designed to minimize refrigerant exposure during homeowner installation. EPA guidance on connecting pre-charged lines continues to evolve — check current requirements at epa.gov before completing that step.
A single-zone DIY installation typically runs $1,000 to $2,350, covering equipment, permit fees, tools, and electrician costs for the 220V connection if needed. A professional install of a comparable system runs $3,000 to $8,000 or more. For homeowners who are genuinely comfortable with the project's scope, the savings are significant and the work is manageable in a weekend.
Yes. Every mini split indoor air handler has a washable mesh pre-filter that protects the internal coil from large dust and debris. Clean it every two weeks during peak use. What that mesh filter doesn't do is remove fine particles, pollen, or pet dander — that's the job of a MERV-rated pleated filter in your central HVAC system. If you run a central system alongside the mini split, a quality MERV 8 to MERV 11 filter in that system is your primary air quality defense.
Check and clean the built-in mesh filter every two weeks during peak heating and cooling seasons. Monthly works during lighter-use periods. Open the front panel, slide out the filter, rinse under warm water, let it dry for 20 to 30 minutes, and reinstall. Never run the system with a wet filter.
The mesh filter inside your mini split handles the coil. The MERV-rated pleated filter in your central system handles your family's air. After a decade of manufacturing filters and working with over two million households, we know that combination is what a home actually needs.
Find the right filter for your system in under 60 seconds.

For a single-zone system, the savings on a DIY install are significant. Here's what both paths actually cost:
On a DIY single-zone install, equipment runs $700 to $1,500, the permit costs $50 to $150, a one-time tool investment adds $100 to $300, and an electrician for the 220V connection — if you need one — runs $200 to $400. Labor is $0. All in, a DIY install typically lands between $1,000 and $2,350. A professional install of the same system runs $1,500 to $3,000 for equipment alone, with labor adding another $1,500 to $5,000 on top — bringing the professional total to $3,000 to $8,000 or more, with permit and electrician costs usually bundled into that figure.
On a single-zone project, a capable DIYer saves $2,000 to $5,000. Professional installation still earns its fee on multi-zone systems with four or more indoor heads, electrical panels that need upgrading, jurisdictions that require licensed sign-off on permit work, and any scenario where the electrical component gives you real pause.
Not ready to go full DIY? Filterbuy HVAC Solutions offers professional installation in our service areas. Our team brings the same obsession with air quality and performance to every install.
The system is running. The room is finally the right temperature. Now here's the step almost every installation guide leaves out entirely — and the one that matters most for your family's air.
After a decade of manufacturing filters and working alongside more than two million households, we know exactly where this gap lives. Your mini split's built-in mesh pre-filter sits behind the front panel of the indoor air handler. It's washable, reusable, and it does exactly what it was built to do: protect the internal coil from large dust particles and debris. What it doesn't catch is the stuff that most affects your family's respiratory health — pollen, pet dander, fine dust, mold spores, and the microscopic particles that pass right through a mesh screen. The mesh filter captures particles larger than 10 microns. A MERV 8 pleated filter captures particles down to 3 microns. A MERV 11 catches finer still.
In a fully ductless home where the mini split is your only conditioning system, that gap matters even more. Here's your post-install checklist:
Locate the built-in mesh filter. Open the front panel of the indoor air handler and slide out the mesh filter — it releases easily.
Rinse and dry before first use. Wash gently under warm water, let it dry completely for at least 20 to 30 minutes, and reinstall before running the system.
Set a biweekly cleaning reminder. During peak heating and cooling season, the mesh filter needs cleaning every two weeks. Monthly cleaning works during lighter-use periods.
Assess your whole-home air quality strategy. If your mini split supplements a central HVAC system, confirm your central system's air filter is a quality MERV 8 to MERV 11 pleated filter. That filter does the heavy lifting on fine particle removal. If the mini split is your only system, a standalone HEPA air purifier in the room fills the gap.
Order your first replacement filters. For central systems, Filterbuy stocks over 600 sizes in MERV ratings from 8 to 13, including custom sizes for non-standard returns. Set up an auto-ship subscription so the protection runs on schedule without any effort on your end.
"After manufacturing filters for over a decade and working with more than two million households, the pattern we see most often is this: the DIYer who saves $3,000 on installation and then skips the post-install filter strategy ends up with a well-installed system that's doing half the job it should — because the mesh filter protecting the coil was never designed to protect your family's air."
Seven sources worth bookmarking before your installation weekend — one for every phase of the project, from sizing and EPA compliance through post-install air quality.
EPA: The Inside Story — A Guide to Indoor Air Quality — Authoritative EPA reference on indoor air pollutant sources, health effects, and mitigation strategies. Essential reading before you finalize your post-install air quality setup. Source: epa.gov/indoor-air-quality-iaq/inside-story-guide-indoor-air-quality
ENERGY STAR: Ductless Heating & Cooling — ENERGY STAR's full guide to mini split heat pumps — efficiency ratings, placement guidance, system selection, and available utility rebates by area. Source: energystar.gov/products/ductless_heating_cooling
U.S. DOE: Ductless Mini Split Heat Pumps — The Department of Energy's technical overview: SEER2 efficiency ranges, ideal use cases, and guidance on choosing a certified unit for your climate zone. Source: energy.gov/energysaver/ductless-minisplit-heat-pumps
ENERGY STAR Certified Mini Split Product Finder — Look up every ENERGY STAR certified mini split model, compare SEER2 ratings, and find utility rebates in your area before you commit to a system. Source: energystar.gov/productfinder/product/certified-mini-split-heat-pumps/results
EPA: Homeowner FAQ on Refrigerant & Section 608 Requirements — The EPA's official answers on refrigerant handling rules for homeowners. Read this before making any decisions about the refrigerant connection step. Source: epa.gov/ods-phaseout/homeowners-and-consumers-frequently-asked-questions
ENERGY STAR Home Upgrade Guide — Puts your mini split installation in context alongside the other five high-impact home upgrades — including heat pump incentives and available IRA tax credits. Source: energystar.gov/products/ductless_heating_cooling
Filterbuy: Find the Right Filter for Your Home — Once your system is running, your whole-home filter strategy is the next critical step. Use Filterbuy's filter finder to match the right MERV rating and size to your central system. Source: https://filterbuy.com/air-filter-buying-guide/
Three data points from government sources that ground every recommendation in this guide:
Indoor air pollutant concentrations are often 2 to 5 times higher than typical outdoor concentrations. Americans spend approximately 90% of their time indoors.
Source: U.S. EPA — Indoor Air Quality | epa.gov/report-environment/indoor-air-quality
ENERGY STAR certified mini splits use up to 60% less energy than standard home electric resistance heaters — making them one of the most efficient comfort upgrades a homeowner can install.
Source: ENERGY STAR — Ductless Heating & Cooling | energystar.gov/products/ductless_heating_cooling
Duct losses account for more than 30% of energy consumption for space conditioning — a key reason ductless mini split systems deliver measurably better efficiency in homes without existing ductwork.
Source: U.S. Department of Energy — Ductless Mini Split Heat Pumps | energy.gov/energysaver/ductless-minisplit-heat-pumps
The hardware has never been more accessible. Pre-charged line sets, quick-connect fittings, and have put ductless comfort within reach of any homeowner willing to do the prep work right. For a capable DIYer who approaches the project with realistic expectations and the right preparation, a weekend installation is entirely doable.
What we want every DIYer to carry past install day: the installation is only the first chapter.
In our experience working with millions of homeowners, the ones who get the most from their systems treat post-install filter setup with the same care they gave the installation itself. They know what the mini split's built-in mesh filter does — and what it doesn't. They have a whole-home filtration strategy in place before the new system turns on. Their MERV rating is set, their filter subscription is live, and they check the air handler filter every two weeks during peak season.
Your family can't see the fine particles, pollen, and allergens moving through your home. Your filtration system can stop them — if you set it up right.
Get the install right. Protect the air. That combination is what turns a solid home improvement project into a home that's actually healthier.
Your action plan, in order:
Calculate your room's BTU requirement using the square footage formula, then confirm sizing against the manufacturer's chart for your target system.
Contact your local building department before ordering equipment. One call confirms the permit requirement and saves weeks of potential headache.
Research utility rebates and IRA tax credits for ENERGY STAR-certified mini split heat pumps in your area using the ENERGY STAR rebate finder.
Order your system and confirm your tools are on hand at least one week before your planned installation weekend.
On installation day, have a second person available for moving and mounting the outdoor condenser unit — it's heavier than it looks.
After the system is running, work through the Post-Install Filter Setup Checklist in the section above before calling the project done.
Set up your whole-home filter subscription at Filterbuy.com. Auto-ship means your air quality protection runs on its own schedule.