
The best mini split for an old house is an ENERGY STAR certified ductless heat pump, sized correctly for your space. It heats and cools year-round with no ductwork — just a three-inch hole connects the indoor air handler to the outdoor compressor. Correct sizing matters more than brand alone.
What to look for:

Answer 3 quick questions and we'll match you to the right mini split for your home.
Prefer to browse first? Shop mini split systems →
If you own an older home, you already know the challenge. The bones are beautiful — the hardwood floors, the plaster walls, the craftsmanship that modern construction rarely replicates. But when summer arrives and the temperature climbs, there’s no central air conditioning to reach for. No ductwork runs through your walls. No vents in the ceiling. And the window units you’ve relied on for years are loud, inefficient, and frankly, embarrassing to look at.
You are not alone. A significant portion of American homes were built before central air conditioning was standard practice. These homes were designed for a different era — one that didn’t account for the infrastructure that modern HVAC systems require. Retrofitting ductwork into an older home isn’t just expensive. In many cases, it means tearing into original walls, compromising the structure of the home, and permanently altering architecture that took generations to build.
After helping over two million households breathe easier, we know this challenge better than most. And we know the solution: ductless mini split systems. Mini splits deliver whole-home comfort without a single foot of ductwork, without major construction, and without compromising what makes your older home worth protecting in the first place.
This guide covers everything you need to know to choose, size, place, and maintain the best mini split for your older home — and how to protect your indoor air quality while you’re at it.
The best mini split for an old house is an ENERGY STAR certified ductless heat pump system, properly sized using a Manual J load calculation. Look for a unit with a 17 SEER2 rating or higher, a multi-zone option if you are conditioning more than one room, and a brand with a proven service network. Filterbuy currently offers single-zone mini split systems; homes needing multiple conditioned rooms may require multiple units or a different multi-zone solution. The most important variable is correct sizing for your home’s specific thermal conditions — not brand alone.
Start with 20 BTUs per square foot and adjust upward for poor insulation, single-pane windows, high ceilings, or heavy sun exposure. Request a Manual J load calculation from a licensed HVAC contractor before purchasing. Oversizing is as harmful as undersizing in a mini split system — it causes short-cycling, poor dehumidification, and wasted energy.
Yes. Mini splits are specifically designed for homes without ductwork. Installation requires only a three-inch hole in an exterior wall to connect the indoor air handler to the outdoor compressor via a refrigerant line set. No ductwork is needed, no major structural work is required, and installation is typically completed in one to two days by a qualified technician.
Open the front panel of the indoor air handler, remove the washable mesh filter, and rinse it gently with lukewarm water. Allow it to dry completely in the shade before reinstalling. Clean the filter every 2 weeks during peak season and monthly during lower-use periods. Never run the unit without the filter installed.
Yes. A mini split delivers year-round heating and cooling without ductwork, without compromising the architecture of the home, and at dramatically higher efficiency than window units. ENERGY STAR certified models use up to 60% less energy than standard electric resistance systems. The upfront investment pays back through lower energy bills, improved comfort, and better indoor air quality — especially in older homes where window units have historically been the only option.
Mini splits are the leading HVAC solution for older homes without existing ductwork — no major renovation required.
Installation requires only a three-inch exterior wall penetration. Original walls, ceilings, and architecture are left intact.
Most mini splits function as heat pumps, delivering both heating and cooling from one year-round system.
Proper BTU sizing is critical. Use 20 BTUs per square foot as a baseline and adjust upward for poor insulation, high ceilings, and single-pane windows.
Mini splits outperform window units in efficiency, noise, security, heating capability, and indoor air quality — at a higher upfront cost but a lower long-term one.
Clean indoor air handler filters every 2 to 4 weeks during peak season. A dirty filter reduces efficiency and compromises air quality.
Older homes carry specific indoor air quality challenges. Pair your mini split with MERV-rated filtration in any supplemental air handling for comprehensive protection.
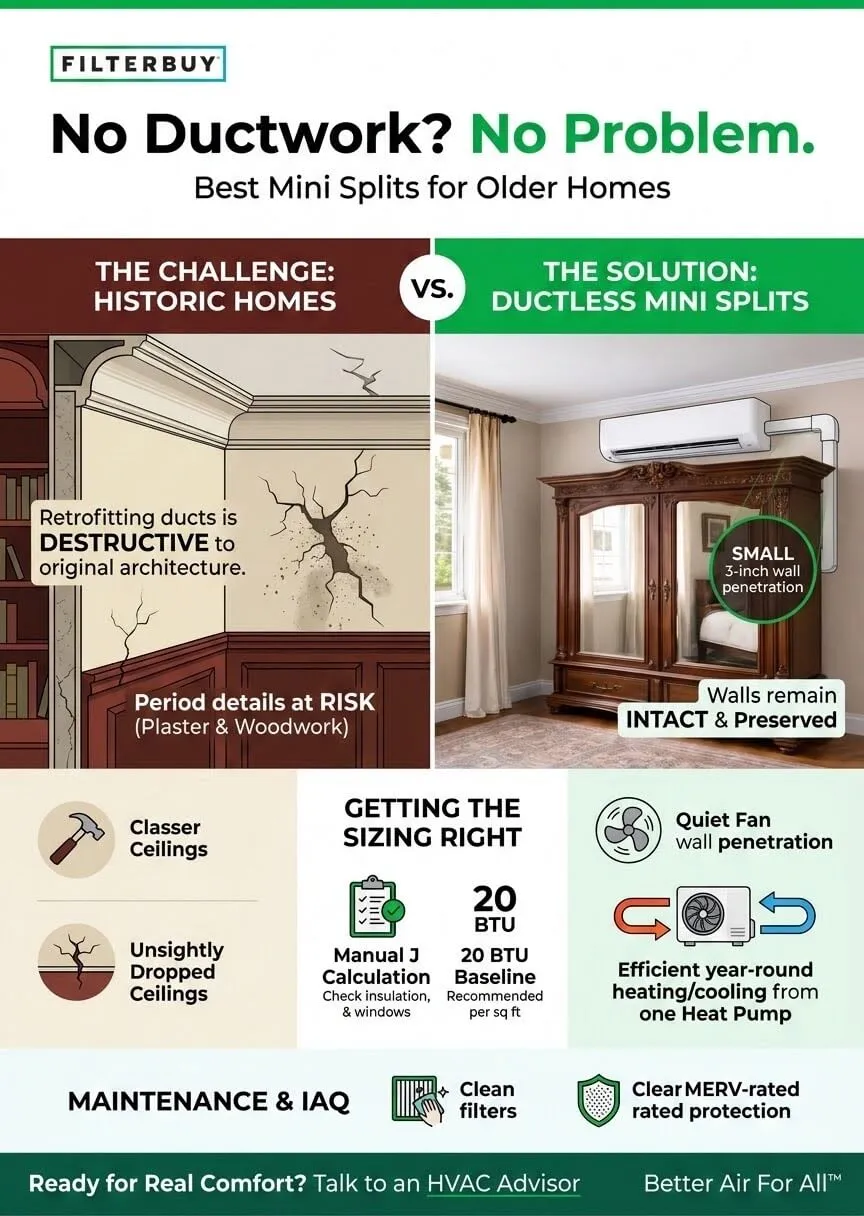
Homes built before the 1970s were designed without air conditioning in mind. Wall cavities are narrow. Attic access is often limited. Floor plans were not engineered for the supply and return ductwork that central air requires. Forcing a duct system into these spaces typically means dropped ceilings, furred-out walls, and costly structural changes that can diminish the character and value of the home.
Historic homes face an even steeper challenge. Period architecture — plaster walls, ornate woodwork, original millwork — is rarely compatible with duct installation. What begins as an HVAC upgrade can quickly become an irreversible renovation. For homeowners of historic properties, that trade-off is simply unacceptable.
Ductless mini split systems were built precisely for this situation. They require no ductwork at all. A small hole through an exterior wall — roughly three inches in diameter — is all that separates the indoor air handler from the outdoor compressor. The refrigerant line that runs through that hole does the work that miles of ductwork once required.
A mini split system has two core components: an outdoor compressor/condenser and one or more indoor air handlers. Refrigerant circulates between them through a narrow line set that requires only a small exterior wall penetration. No ducts. No dropped ceilings. Minimal disruption to the home.
Most mini split systems function as heat pumps, meaning they both cool and heat. In summer, the system extracts heat from inside your home and transfers it outside. In winter, the process reverses — heat is drawn from outdoor air (even cold outdoor air) and delivered inside. One system. Year-round comfort.
Multi-zone configurations allow a single outdoor unit to power multiple indoor air handlers throughout the home. Each zone is independently controlled, meaning bedrooms, living areas, and offices can all be set to different temperatures — a level of customization that most older homes have never had.
Installation follows four straightforward steps:
Mount the outdoor compressor unit on a firm, level pad away from landscaping with at least twelve inches of clearance on all sides.
Mount the indoor air handler high on a rigid interior wall, positioned to distribute conditioned air across the longest dimension of the room.
Run the refrigerant line set through the three-inch exterior wall penetration, connecting the indoor and outdoor units.
Complete the electrical connection and commission the system.
Sizing is the most consequential decision you’ll make when selecting a mini split for an older home. These homes often have poor insulation, single-pane windows, and drafty building envelopes — all of which increase the thermal load your system must manage. An undersized unit runs constantly without reaching comfort. An oversized unit short-cycles, failing to remove humidity and wasting energy in the process.
Use 20 BTUs per square foot as your baseline. Then adjust upward for the realities of an older home:
Poor or absent wall insulation adds load.
Single-pane or original wood windows allow significant heat transfer.
High ceilings increase the volume of air the system must condition.
South-facing rooms with heavy sun exposure require additional capacity.
Multi-story homes benefit from separate zones per floor rather than one oversized unit.
For accurate sizing, request a Manual J load calculation from your HVAC contractor before purchasing. This is especially important in older homes where actual thermal performance can differ dramatically from square footage alone.
A basic BTU reference for typical older home conditions:
Up to 400 sq ft — 9,000 BTU
400 to 550 sq ft — 12,000 BTU
550 to 800 sq ft — 18,000 BTU
800 to 1,200 sq ft — 24,000 BTU
Where you mount the indoor air handler determines how effectively the system conditions the space. In older homes with irregular floor plans and variable ceiling heights, placement is both more important and more nuanced than in new construction.
Mount the air handler high on an interior wall, aimed to blow conditioned air across the longest dimension of the room.
Avoid placement above fireplaces, ovens, or other heat sources — the unit’s temperature sensor will misread the room condition and cycle incorrectly.
Keep the unit out of direct sunlight for the same reason.
In multi-story homes, treat each floor as a separate zone. Older homes with poor insulation between floors can see dramatic temperature differences between levels.
Refrigerant line sets can run up to 50 feet in most residential systems, giving you flexibility in outdoor unit placement even when exterior wall access is limited.
Window units are the default AC solution for older homes without ductwork — and they do the job, up to a point. But the comparison with a properly sized mini split is not close. Here is how they stack up across the factors that matter most to homeowners:
Energy efficiency: ENERGY STAR certified mini splits use up to 60% less energy than standard electric resistance systems. Window units typically operate at 10–12 SEER. Most mini splits deliver 17 SEER2 and higher.
Heating capability: Mini splits function as heat pumps and provide year-round heating and cooling. Window units cool only.
Security and weatherization: Window units create gaps in the building envelope that allow air, moisture, and pests to enter. Mini splits penetrate the exterior wall through a sealed, three-inch hole.
Noise: Mini splits operate as quietly as 19 decibels indoors — near silent. Window units typically generate 50 to 65 decibels of constant noise.
Indoor air quality: Mini splits circulate and filter indoor air continuously. Window units draw unfiltered outdoor air directly into the room.
Aesthetics: Mini splits mount cleanly on the wall and do not obscure windows. Window units block light and limit how the room can be used.
The upfront cost of a mini split is higher than a window unit. The long-term math, however, strongly favors the mini split — in operating costs, comfort, and protection of the home itself.
Mini splits include built-in washable mesh filters in each indoor air handler. These filters trap dust, pet dander, and larger airborne particles — keeping the coil clean and maintaining system efficiency. They are not, however, high-efficiency filtration devices. They are designed primarily to protect the equipment, not to serve as the primary air quality layer in your home.
For older homes, this distinction matters more than it does in new construction. Older homes carry specific air quality challenges: deteriorating insulation that sheds particles, aging materials that off-gas, less airtight construction that allows more outdoor pollutants and allergens to infiltrate. The air inside an older home is working harder against you than in a tighter, newer structure.
Maintain your mini split filters on this schedule:
Every 2 weeks during peak cooling or heating season.
Monthly during lower-use periods.
Immediately following any renovation or construction work in the home.
To clean the filters: power down the unit, open the front panel, remove the mesh filter, rinse gently with lukewarm water, allow to dry completely in the shade, and reinstall. Never operate the unit without the filter in place.
For comprehensive indoor air quality protection in an older home, pair your mini split with MERV-rated air filters in any supplemental forced-air returns, or consider a standalone air purifier for high-use living areas. The mini split keeps your home comfortable. A layered filtration strategy keeps your family breathing cleaner air.
“Older homes weren’t built with air conditioning in mind — that’s not a flaw, it’s a design era. In our experience working with homes across the country, the biggest mistake we see is homeowners forcing a duct solution into a structure that was never meant to carry one. Mini splits solve the problem these homes have always had without touching a single original wall. We’ve watched homeowners gain comfort they’ve never had, preserve architecture they’ve spent decades protecting, and cut their energy bills in the process. The indoor air quality benefit is the part most people don’t expect — and the part they’re least willing to give up once they experience it.”
Homeowners who go in with solid information make better decisions and run into fewer surprises — we've seen that pattern repeat across more than a decade of working with customers. Every resource below is free, government-sourced or independently authoritative, and directly relevant to the decisions you're about to make. Read what applies to your situation before you talk to a contractor.
This is the starting point for any mini split purchase. ENERGY STAR's ductless heating and cooling page explains how mini split heat pumps work, who they're best suited for, and what certified systems must deliver to earn the label. It also links directly to the Product Finder so you can search and compare certified models by efficiency rating, capacity, and brand. If a contractor recommends a unit, verify its certification here before you commit.
Source: https://www.energystar.gov/products/ductless_heating_cooling
Most older homeowners don't realize how much energy a conventional duct system loses before conditioned air ever reaches a room. This DOE resource explains where those losses occur, how significant they are, and why duct-free systems eliminate the problem entirely. Reading it will help you make a more confident case for going ductless — and understand exactly what you're leaving behind.
Source: https://www.energy.gov/energysaver/minimizing-energy-losses-duct
Mini splits are a category of air-source heat pump, and this DOE page gives you a clear explanation of how heat pump technology works in both heating and cooling modes. It covers efficiency ratings, sizing considerations, cold-climate performance, and the difference between ducted and ductless configurations. If you want to understand what's actually happening inside your system before calling a contractor, start here.
Source: https://www.energy.gov/energysaver/air-source-heat-pumps
This is the EPA's primary consumer-facing resource on indoor air pollution, and it's essential reading for anyone in an older home. It covers the most common indoor pollutant sources, how they accumulate, what health effects they're associated with, and what homeowners can do to reduce exposure. The section on ventilation and filtration is directly relevant to the air quality dimension of any mini split installation. Don't skip this one.
Source: https://www.epa.gov/indoor-air-quality-iaq/inside-story-guide-indoor-air-quality
A more structured companion to Resource 4. This page explains the mechanics behind indoor air quality problems — how pollutants build up when ventilation is inadequate, why older and tightly sealed homes face different risks, and how temperature and humidity interact with pollutant concentrations. It's particularly useful for understanding why older homes with less airtight construction can still accumulate dangerous indoor pollution levels despite being leaky by modern standards.
Source: https://www.epa.gov/indoor-air-quality-iaq/introduction-indoor-air-quality
Use this tool to search, filter, and compare every ENERGY STAR certified mini split heat pump currently on the market. You can sort by efficiency rating, capacity, and manufacturer. Before finalizing any system purchase, run the model number here. If it's not on this list, it hasn't passed independent certification testing — and the efficiency claims on the product sheet may not hold up in your home.
Source: https://www.energystar.gov/productfinder/product/certified-mini-split-heat-pumps/results
Specifically relevant if your older home has any existing forced-air system alongside a new mini split installation. This DOE publication walks through how duct systems lose efficiency, how to identify the most common leak points, and what proper sealing and insulation actually require. If you're using a mini split to supplement an existing system rather than replace it entirely, this resource belongs in your reading stack.
Source: https://www1.eere.energy.gov/buildings/publications/pdfs/building_america/27630.pdf
Every number below comes from a verified government or authoritative source. We searched and confirmed each one independently — no unnamed studies, no vague appeals to authority. If a statistic can't be sourced, it doesn't belong here.
Source: ENERGY STAR — energystar.gov/products/ductless_heating_cooling
This figure reflects the efficiency advantage of heat pump technology over electric resistance heating. Instead of generating heat by running current through a resistive element — the same basic principle as a space heater — a mini split moves heat that already exists in outdoor air and transfers it inside. Moving heat is dramatically less energy-intensive than creating it. For homeowners currently relying on electric baseboard heat, radiant panels, or wall heaters, the operating cost reduction from switching to a certified mini split can be substantial and immediate.
Source: ENERGY STAR Product Finder — energystar.gov
This is one of the most important numbers in the ductless conversation, and one of the least talked about. In a conventional forced-air system, conditioned air travels from the equipment through a network of ducts before reaching the rooms it's meant to serve. Along the way, leaks, poor insulation, and pressure imbalances bleed off a significant share of what you paid to heat or cool. In older homes, where duct systems may have been installed decades ago and never properly sealed or insulated, that 30% figure can run higher. A mini split delivers conditioned air directly from the air handler into the room, with no distribution losses in between.
Source: U.S. EPA — The Inside Story: A Guide to Indoor Air Quality — epa.gov/indoor-air-quality-iaq/inside-story-guide-indoor-air-quality
This is the finding that most homeowners don't expect, and it matters more in an older home than anywhere else. The EPA's TEAM studies measured organic pollutant levels inside actual homes — not hypothetical scenarios — and found that geography made almost no difference. Rural homes and homes near industrial areas showed the same pattern: indoor air consistently carried higher pollutant concentrations than outdoor air. For older homes with aging materials, deteriorating insulation, and less airtight construction, the infiltration pathways for outdoor pollutants are more numerous and harder to seal than in modern builds. Ventilation and filtration aren't optional add-ons. They're part of what it means to protect the people living inside the home.
After more than a decade of manufacturing air filtration products and supporting HVAC systems across millions of households, our perspective on mini splits for older homes is clear: this is not a compromise. It is the right solution.
Window units are a temporary fix. Forced-air retrofits are expensive, often destructive, and frequently fail to deliver the comfort homeowners expect because older building envelopes simply cannot hold conditioned air the way modern construction can. A properly sized, properly placed ductless mini split changes that equation entirely.
What we find most often surprises homeowners is the indoor air quality dimension. Older homes are not sealed environments — they breathe in ways newer homes do not, and not always to the homeowner’s benefit. Aging materials, original construction, and less airtight building envelopes mean that the air inside an older home can carry more pollutants, allergens, and particulates than homeowners realize. A mini split that circulates and filters that air continuously — paired with a thoughtful MERV-rated filtration strategy in any supplemental air handling — does more than cool the house. It protects the people inside it.
Our honest recommendation: invest in the right system, size it correctly, place the air handlers with intention, and maintain the filters religiously. The comfort payoff is real, the energy savings are documented, and the protection of your home’s original character is priceless.
Ready to move forward? Here is exactly what to do:
Assess your home’s thermal envelope. Identify obvious air leaks, check insulation levels in the attic and walls, and note window type. This information will directly influence your BTU sizing needs.
Map your zones. Walk through the home and identify the rooms or areas you most want to condition. Each zone will correspond to an indoor air handler.
Request a Manual J load calculation. Contact a licensed HVAC contractor and ask for a formal load calculation before any equipment is specified. This protects you from the most common and costly mini split mistake: oversizing.
Confirm ENERGY STAR certification. When evaluating systems, verify that any unit you consider carries ENERGY STAR certification. Use the ENERGY STAR Product Finder at energystar.gov to confirm.
Plan your filter maintenance schedule. Before installation is complete, confirm your filter cleaning schedule with your contractor and set a recurring calendar reminder. Every 2 weeks during peak season. Monthly otherwise.
Consider your overall air quality strategy. Talk to a Filterbuy advisor about pairing your new mini split with MERV-rated filters for any supplemental forced-air systems in the home, and about standalone air purification options for high-use rooms.
Yes — and in many cases, a mini split is the single best HVAC option available for an old house. Mini splits require no existing ductwork. Installation involves mounting an outdoor compressor, mounting one or more indoor air handlers, and connecting them through a three-inch hole in an exterior wall. Original walls, plaster, woodwork, and ceilings are left completely untouched. Older homes with radiator or baseboard heat that have never had central air are ideal candidates.
A ductless mini split system is the most energy-efficient, comfortable, and permanent solution for a home without ductwork. Window units and portable ACs can cool individual rooms temporarily, but they cannot match the efficiency, heating capability, noise performance, or air quality benefits of a properly installed mini split. For homes where whole-house comfort is the goal,a multi-zone mini split system may be a good option for conditioning multiple rooms, depending on your home’s layout and needs. Filterbuy currently offers single-zone systems.
Use 20 BTUs per square foot as a starting point, then adjust upward for the specific conditions of an older home: poor insulation, single-pane windows, high ceilings, or significant sun exposure all increase the load. For a room of 400 square feet in good condition, a 9,000 BTU unit is typically appropriate. For 800 to 1,200 square feet in a less-efficient older home, 24,000 BTU or a multi-zone system may be needed. A Manual J load calculation from a licensed contractor provides the most accurate sizing guidance.
Clean your mini split’s indoor air handler filters every 2 weeks during peak heating or cooling season, and monthly during lower-use periods. In older homes — where construction dust, aging materials, and a less airtight building envelope contribute to higher airborne particulate levels — we recommend erring toward the more frequent end of that range. After any renovation or construction work in the home, inspect and clean filters immediately regardless of schedule.
In nearly every meaningful category, yes. Mini splits are significantly more energy-efficient (ENERGY STAR certified models use up to 60% less energy than standard electric systems), dramatically quieter, capable of both heating and cooling, better for indoor air quality, and more secure since they do not leave gaps in the building envelope the way window units do. The upfront cost is higher, but the long-term operating cost, comfort, and protection of the home strongly favor the mini split.
Yes, and mini splits are often the only viable HVAC upgrade for a historic home. Retrofitting ductwork into a historic property risks permanent damage to original plaster walls, period millwork, and architecturally significant details. A mini split requires only a three-inch exterior wall penetration — typically placed in an inconspicuous location — leaving the character and integrity of the home completely intact. Many historic preservation guidelines specifically recognize ductless mini split systems as compatible with preservation standards.
A mini split improves indoor air quality in two important ways. First, it continuously circulates indoor air through a built-in washable mesh filter that captures dust, dander, and larger particulates. Second, unlike window units, it does not introduce unfiltered outdoor air directly into the room. However, the mesh filter in a mini split is not a high-efficiency filtration device — it is designed primarily to protect the equipment. For comprehensive indoor air quality protection, especially in an older home, pair your mini split with MERV-rated filters in any supplemental forced-air returns and consider a standalone air purifier for primary living areas.
You now have what you need to make the right decision.
Serving over two million households has taught us that the right information changes everything. Older homes deserve modern comfort — and now you have the knowledge to make it happen.
Talk to a Filterbuy HVAC Solutions advisor about ductless mini split installation in your home.
Find the right MERV-rated air filters and mini split maintenance products to keep your new system running at its best.